I Added WebDAV to an Open Source WikiWiki!
Tonight I did some hacking and managed to do some basic integration of the WebDAV protocol and a WikiWiki. I thought it would be cool if I could mount a WikiWiki as a folder on my hard drive, and see all of its Wiki pages as pages that could be edited in Microsoft Office or Notepad and saved by simply going to File > Save. I was able to do so, with some caveats that I'll explain later.
WebDAV is a cool protocol that is several years old now that allows programs to mount remote web servers as file shares; it is baked into many programs, including Microsoft Office and Macromedia Dreamweaver. It is much easier to work with than FTP and makes saving and loading files from a remote share much more seamless. WikiWikis are collaborative web sites that have pages that can be edited through a browser and which are completely open and co-created by users. Why not combine these two, so that when you are at home or work you can use more full featured programs like Dreamweaver to edit Wiki pages, but when you are on the road you can use the browser?
One issue is that Wiki pages are currently not in HTML; the Wiki that I ended up using saves things as flat text files, so the integration that I managed to achieve tonight is still pretty basic.
I'll first talk about what the integration looks like for the end user through some actual screenshots, and then talk about the technical details of how to do it yourself (it's pretty straightforward). First you need to have a WebDAV client. Microsoft XP has one built in, but I ran into problems using it, so I needed to download one that better conforms to the WebDAV standard (Microsoft and standards.... sigh). I ended up using WebDrive, which can mount a WebDAV server and make it look like a drive on your machine.
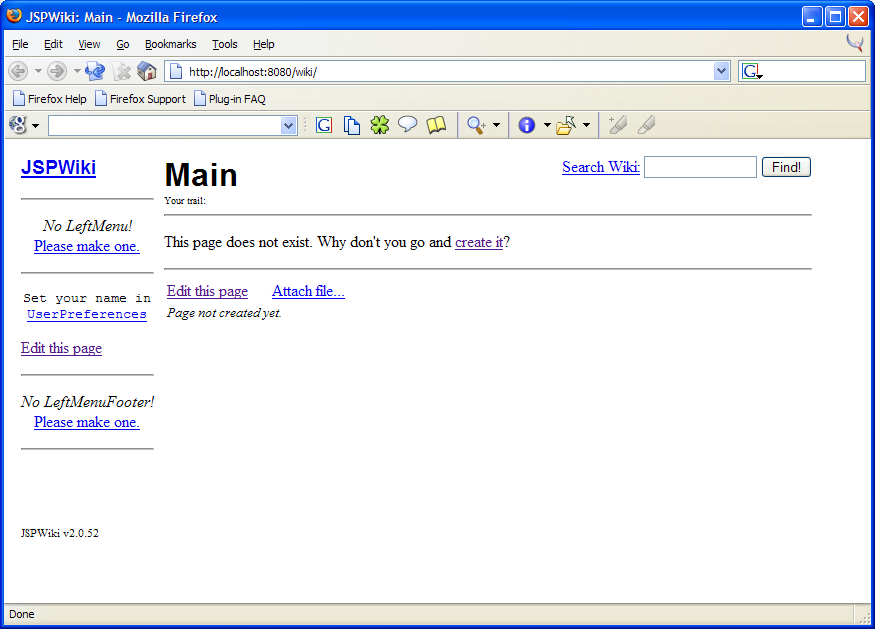
First, visit the WikiWiki through a browser; you'll see a standard WikiWiki with nothing defined:
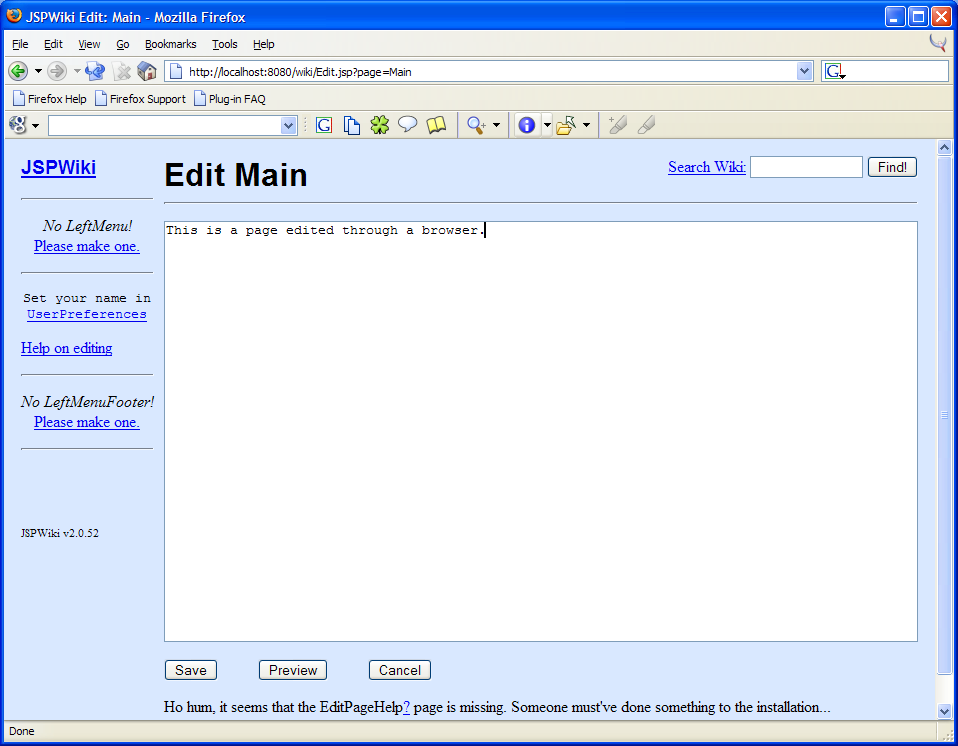
Edit the Main page as follows and then save it:
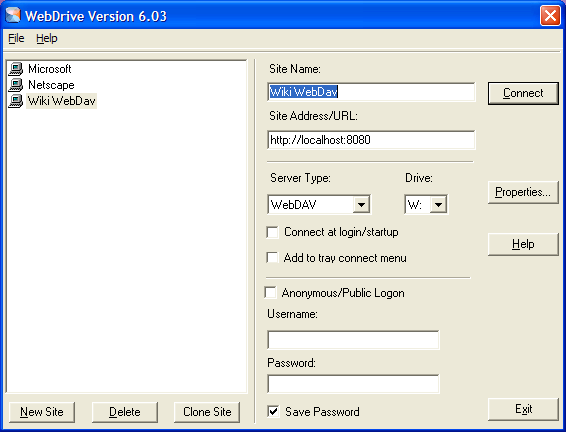
To mount the remote WikiWiki, you simply take its address and type it into WebDrive (in this example I am running it on my own machine):
Then, once you press Connect, you will see this share shown as a drive and its file contents:
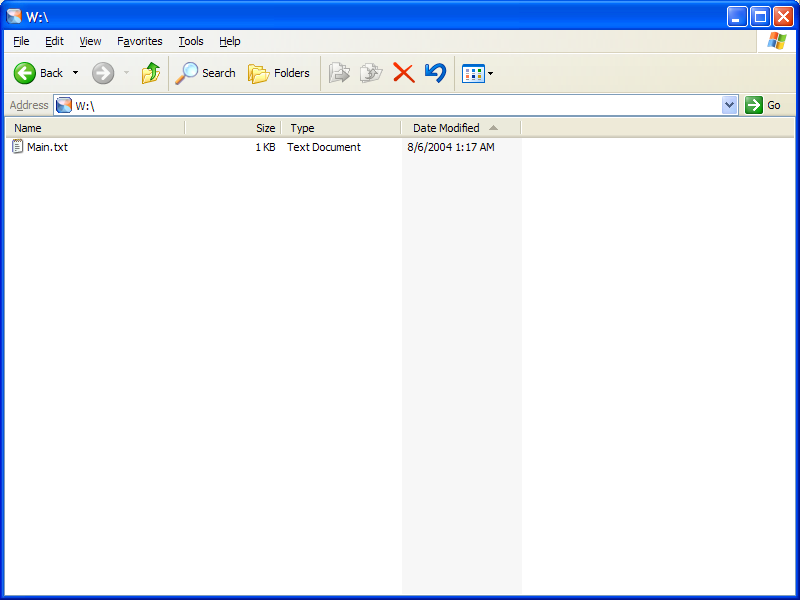
You can see that the Main page is there, named Main.txt. Double click the Main.txt file and it should open in Notepad:
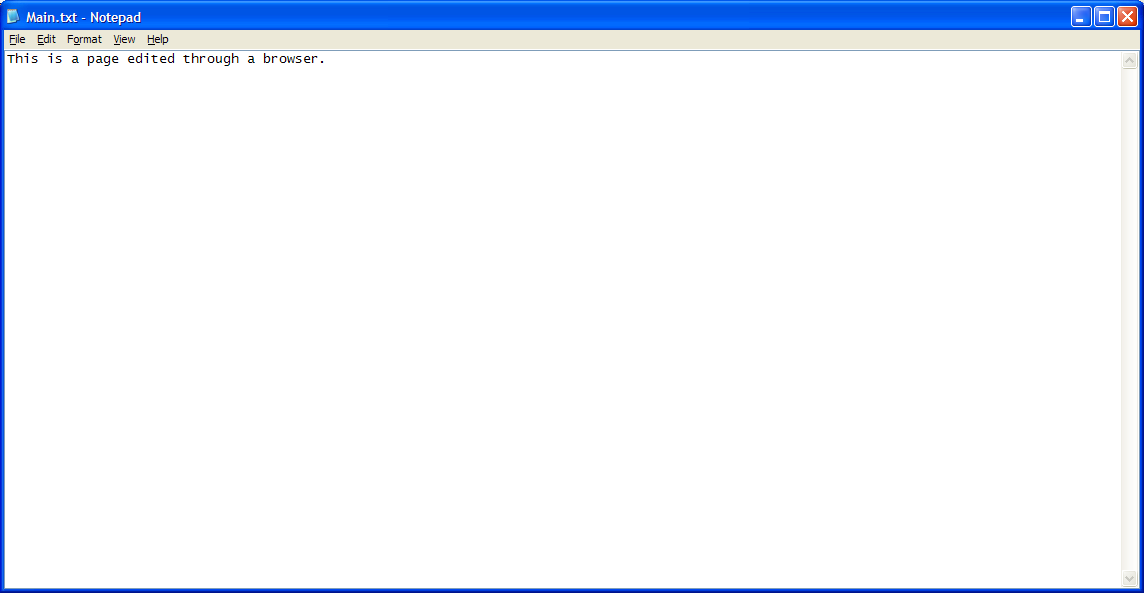
Change the text to This is a page edited through Notepad; also make sure to see a page about [PaperAirplane] and go to File > Save and save the modified page. Then, go back to your browser and go to the WikiWiki again. You should see the following:
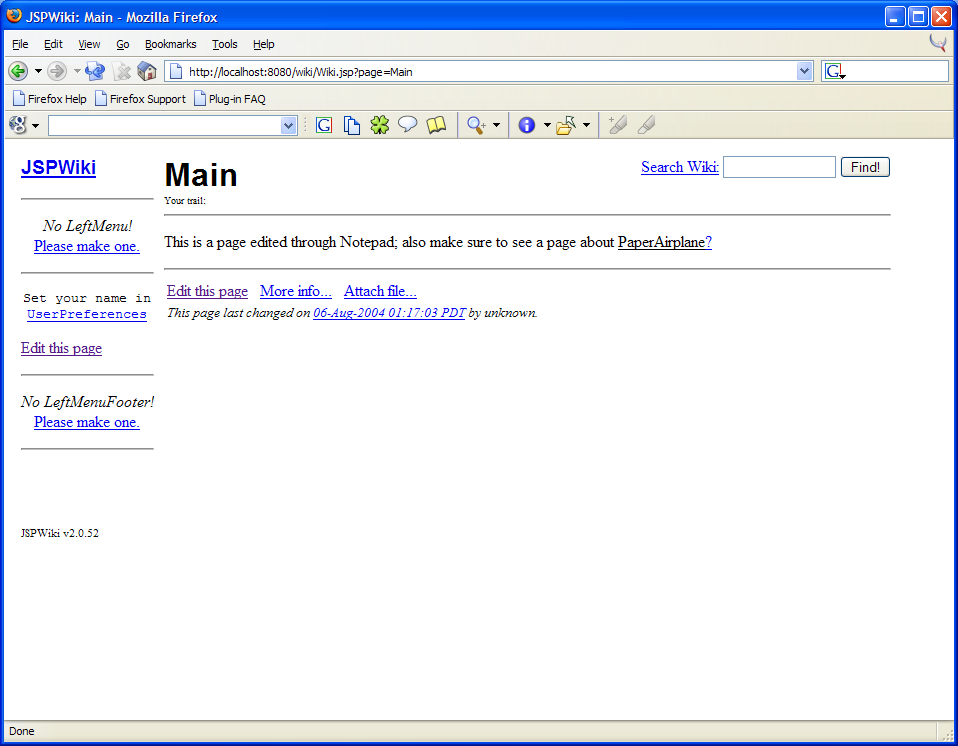
You've modified the WikiWiki remotely through WebDAV! You could even go back to your WebDAV client and create a file named PaperAirplane.txt in that directory and fill it out. Then, when you return to the WikiWiki in the browser, the Wiki-link to PaperAirplane will be filled out.
Okay, here's the technical details. The integration is actually really straightforward. First I grabbed Apache Tomcat 5.0 here. Next, grab JSPWiki, a WikiWiki written in JSP, from here. Unzip that file and grab the file in there named JSPWiki.war; unzip that file into tomcat/webapps/wiki. The WebDAV server we use is a servlet that comes bundled with Tomcat that implements WebDAV; it is in tomcat/webapps/webdav. Remove everything in tomcat/webapps/ROOT and rename tomcat/webapps/webdav to tomcat/webapps/ROOT (evidently some WebDAV clients have trouble mounting WebDAV servers that aren't mounted at the root of the HTTP server).
Now you need to enable WebDAV by going into tomcat/webapps/ROOT/WEB-INF/web.xml and change the top to the following:
Now that WebDAV is enabled, we need to now integrate the WikiWiki into it. We could get fancy and create our own JNDI resource factory that internally hooks into the WikiWiki, but I wanted to get something fast. We are going to do a hack: why not just have the WikiWiki save all of its files over into tomcat/webapps/ROOT, so that the WebDAV server just thinks the WikiWiki pages are the normal files it serves.
To do this, open tomcat/webapps/wiki/WEB-INF/jspwiki.properties and find the line that defines the property jspwiki.fileSystemProvider.pageDir and set its value to:
jspwiki.fileSystemProvider.pageDir = C:\\dev\\jakarta-tomcat-5.0.27\\webapps\\ROOT
where the c:\\dev\\jakarta-tomcat-5.0.27 is the actual place you installed Tomcat.
Now start up Tomcat by going to tomcat/bin/startup.bat.
You now have a WebDAV-enabled WikiWiki!
So there is actually a lot more work to do to make this truly robust, as well as to do some cool stuff; if people are interested in helping it would be great. The following would be cool places to take this:
Here's the JavaDocs to the Tomcat WebDAV servlet and here's the source code. Also, here's the source code to the portion of the WebDAV servlet that hides the resources it shares behind a JNDI interface.
Special thanks to Dylan Parker for helping me iron out some bugs.
WebDAV is a cool protocol that is several years old now that allows programs to mount remote web servers as file shares; it is baked into many programs, including Microsoft Office and Macromedia Dreamweaver. It is much easier to work with than FTP and makes saving and loading files from a remote share much more seamless. WikiWikis are collaborative web sites that have pages that can be edited through a browser and which are completely open and co-created by users. Why not combine these two, so that when you are at home or work you can use more full featured programs like Dreamweaver to edit Wiki pages, but when you are on the road you can use the browser?
One issue is that Wiki pages are currently not in HTML; the Wiki that I ended up using saves things as flat text files, so the integration that I managed to achieve tonight is still pretty basic.
I'll first talk about what the integration looks like for the end user through some actual screenshots, and then talk about the technical details of how to do it yourself (it's pretty straightforward). First you need to have a WebDAV client. Microsoft XP has one built in, but I ran into problems using it, so I needed to download one that better conforms to the WebDAV standard (Microsoft and standards.... sigh). I ended up using WebDrive, which can mount a WebDAV server and make it look like a drive on your machine.
First, visit the WikiWiki through a browser; you'll see a standard WikiWiki with nothing defined:

Edit the Main page as follows and then save it:

To mount the remote WikiWiki, you simply take its address and type it into WebDrive (in this example I am running it on my own machine):

Then, once you press Connect, you will see this share shown as a drive and its file contents:

You can see that the Main page is there, named Main.txt. Double click the Main.txt file and it should open in Notepad:

Change the text to This is a page edited through Notepad; also make sure to see a page about [PaperAirplane] and go to File > Save and save the modified page. Then, go back to your browser and go to the WikiWiki again. You should see the following:

You've modified the WikiWiki remotely through WebDAV! You could even go back to your WebDAV client and create a file named PaperAirplane.txt in that directory and fill it out. Then, when you return to the WikiWiki in the browser, the Wiki-link to PaperAirplane will be filled out.
Okay, here's the technical details. The integration is actually really straightforward. First I grabbed Apache Tomcat 5.0 here. Next, grab JSPWiki, a WikiWiki written in JSP, from here. Unzip that file and grab the file in there named JSPWiki.war; unzip that file into tomcat/webapps/wiki. The WebDAV server we use is a servlet that comes bundled with Tomcat that implements WebDAV; it is in tomcat/webapps/webdav. Remove everything in tomcat/webapps/ROOT and rename tomcat/webapps/webdav to tomcat/webapps/ROOT (evidently some WebDAV clients have trouble mounting WebDAV servers that aren't mounted at the root of the HTTP server).
Now you need to enable WebDAV by going into tomcat/webapps/ROOT/WEB-INF/web.xml and change the top to the following:
<servlet>

<servlet-name>webdav</servlet-name>

<servlet-class>org.apache.catalina.servlets.WebdavServlet</servlet-class>

<init-param>

 <param-name>debug</param-name>

 <param-value>1</param-value>

</init-param>

<init-param>

 <param-name>listings</param-name>

 <param-value>true</param-value>

</init-param>

<init-param>

 <param-name>readonly</param-name>

 <param-value>false</param-value>

</init-param>

<load-on-startup>1</load-on-startup>

</servlet>
Now that WebDAV is enabled, we need to now integrate the WikiWiki into it. We could get fancy and create our own JNDI resource factory that internally hooks into the WikiWiki, but I wanted to get something fast. We are going to do a hack: why not just have the WikiWiki save all of its files over into tomcat/webapps/ROOT, so that the WebDAV server just thinks the WikiWiki pages are the normal files it serves.
To do this, open tomcat/webapps/wiki/WEB-INF/jspwiki.properties and find the line that defines the property jspwiki.fileSystemProvider.pageDir and set its value to:
jspwiki.fileSystemProvider.pageDir = C:\\dev\\jakarta-tomcat-5.0.27\\webapps\\ROOT
where the c:\\dev\\jakarta-tomcat-5.0.27 is the actual place you installed Tomcat.
Now start up Tomcat by going to tomcat/bin/startup.bat.
You now have a WebDAV-enabled WikiWiki!
So there is actually a lot more work to do to make this truly robust, as well as to do some cool stuff; if people are interested in helping it would be great. The following would be cool places to take this:
- Determine why the Windows XP WebDAV client had trouble with the Tomcat WebDAV servlet; the problem seems to be in the PROPFIND method of the Tomcat WebDAV servlet. If we can solve this then users can use the WebDAV client bundled into Windows without having to download their own.
- Integrate the WikiWiki and WebDAV systems not through the filesystem. Instead, the Tomcat WebDAV servlet can actually serve anything through a JNDI abstraction. We need to hide the WikiWiki behind that abstraction.
- There are some small bugs in the fact that the WikiWiki caches things sometimes and doesn't know that pages have been updated; it would be nice to fix these.
- Finally, we need to update JSPWiki so that it saves its pages into HTML or XHTML. Then, users could use Mozilla Composer or Macromedia Dreamweaver to truly edit their Wiki pages. We also need to update JSPWiki to use a rich text edit control that deals with HTML.
Here's the JavaDocs to the Tomcat WebDAV servlet and here's the source code. Also, here's the source code to the portion of the WebDAV servlet that hides the resources it shares behind a JNDI interface.
Special thanks to Dylan Parker for helping me iron out some bugs.

Comments
<servlet-mapping>
<servlet-name>webdav</servlet-name>
<url-pattern>/webdav/*</url-pattern>
</servlet-mapping>